I recently implemented AWS Cognito for a work project, and I was impressed by how fast I could get it up and running. Since we were already leveraging the AWS ecosystem with Lambda and DynamoDB, choosing Cognito was a no-brainer for hitting the ground running.
I started with the built-in Cognito Hosted UI because it’s fast for adding authentication. It was again a breeze to set up, but I realized it doesn't offer much in terms of customization other than some background and minor brand styling. We’ll probably move to a custom UI down the line to make the sign-in experience match the brand's look and feel.
This post will succinctly walk you through the process of wiring AWS Cognito to your own application in a few steps. We'll go over the following topics one after another:
- AWS Cognito User Pools
- Frontend app (Next.js App router)
- Backend (Express)
- JWT + JWKS verification
High-Level Architecture
Before we touch any code, it is important to establish a mental model of how AWS Cognito works from start to finish. The steps are:
- User signs in via Cognito using hosted UI or custom UI.
- Cognito issues JWTs (ID token + Access token)
- Frontend app stores and sends token with API requests
- Backend verifies token using Cognito's public keys (JWKS)
- API returns data after verification
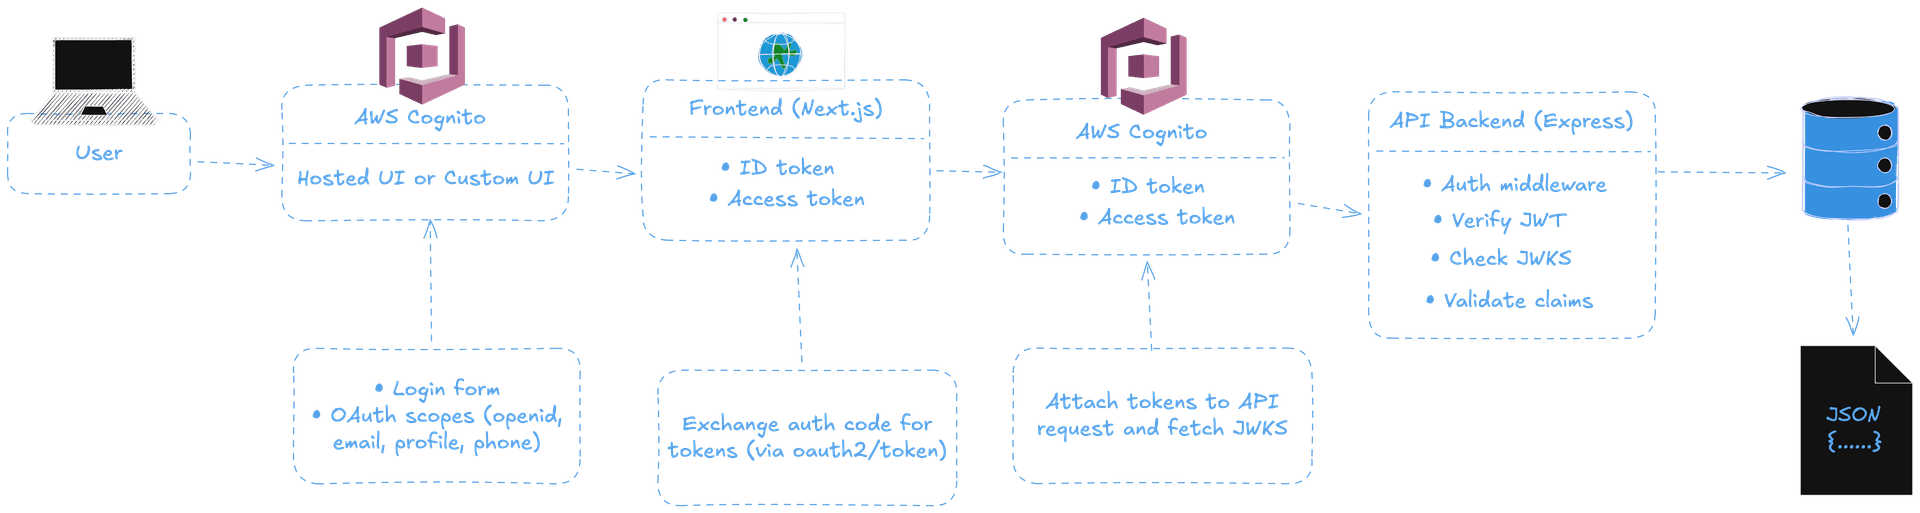
aws cognito — high level architecture
We don't manage sessions or server-side auth state; we use plain, simple, stateless JWT authentication.
Step 1: Create a Cognito User Pool
In AWS Console:
- Go to Cognito → User Pools
- Create a new pool
- Choose Email (or Username + Email)
- Enable:
- Email verification
- Password policy (strong)
- Add an App Client
- Disable client secret (important for frontend apps)
- Save these values as you'll use this to talk to AWS Cognito service:
- User Pool ID
- App Client ID
- Region
Step 2: Configure Hosted UI
Since I’ve utilized Hosted UI myself, I’ll be walking through that, but feel free to use a custom UI if you want.
Set the following values:
- Callback URL → http://localhost:3000/auth/callback
- Sign-out URL → http://localhost:3000
- OAuth scopes:
- openid
- profile

aws cognito — managed ui settings
Under OAuth scopes, you can also add phone if you'd need SMS-based MFA. Since we have this coming down the line so we opted to add the option already.
Step 3: Frontend – Next.js Auth Setup
Set the environment variables:
NEXT_PUBLIC_COGNITO_REGION=us-east-1
NEXT_PUBLIC_COGNITO_USER_POOL_ID=us-east-1_XXXXXXX
NEXT_PUBLIC_COGNITO_CLIENT_ID=XXXXXXXX
NEXT_PUBLIC_COGNITO_DOMAIN=your-domain.auth.us-east-1.amazoncognito.com- At the top-right corner of the AWS Console → Use the
region(looks likeus-east-1) of the user pool you created. - Get the User Pool ID: AWS Console → User Pools → Click on your user pool and copy
User Pool ID. - Get the Client ID: Inside User Pool → Go to App integration → Under App clients, click your app client, and copy
Client ID. - Get Domain: Inside User Pool → Go to App integration → Visit Domain and copy the
domainshown likemy-app.auth.us-east-1.amazoncognito.com.
Step 4: Redirect user to Cognito Hosted UI login
From a button or a link redirect the user to Hosted UI for them to be able to login and authenticate. Use the below signIn() utility:
export function signIn() {
  const base = COGNITO_DOMAIN.startsWith("http") ? COGNITO_DOMAIN : `https://${COGNITO_DOMAIN}`;

  const params = new URLSearchParams({
    client_id: COGNITO_CLIENT_ID,
    response_type: "code",
    scope: COGNITO_SCOPE, // e.g. "openid email profile"
    redirect_uri: COGNITO_REDIRECT_URI,
  });

  return `${base}/login?${params.toString()}`;
}
redirect_uri should exactly match what you have set in the AWS Cognito console.
Step 5: Handle callback
This is where the exchange for code for an access and id token occurs (optionally refresh token).
import { redirect } from "next/navigation";

type Props = {
  searchParams: { code?: string };
};

export default async function CallbackPage({ searchParams }: Props) {
  const code = searchParams.code;

  if (!code) {
    redirect("/login");
  }

  const body = new URLSearchParams({
    grant_type: "authorization_code",
    client_id: process.env.NEXT_PUBLIC_COGNITO_CLIENT_ID!,
    code,
    redirect_uri: "http://localhost:3000/auth/callback",
  });

  await fetch(`https://${process.env.NEXT_PUBLIC_COGNITO_DOMAIN}/oauth2/token`, {
    method: "POST",
    headers: { "Content-Type": "application/x-www-form-urlencoded" },
    body,
  });

  // 👉 Tokens can be stored securely here (cookies/session)

  redirect("/dashboard"); // or to any other protected route
}
Once this is done, the user is authenticated and can now hit the API endpoints.
Step 6: Protect API routes
To authenticate a user in the backend, you can utilize the packages jsonwebtoken and jwks-rsa. Install them by running:
npm install jsonwebtoken jwks-rsaUsing the following middleware, authenticate every API request:
import jwt from "jsonwebtoken";
import jwksClient from "jwks-rsa";

const client = jwksClient({
  jwksUri: `https://cognito-idp.${process.env.AWS_REGION}.amazonaws.com/${process.env.COGNITO_USER_POOL_ID}/.well-known/jwks.json`,
});

function getKey(header: any, callback: any) {
  client.getSigningKey(header.kid, (err, key) => {
    const signingKey = key?.getPublicKey();
    callback(err, signingKey);
  });
}

export function requireAuth(req, res, next) {
  const token = req.headers.authorization?.replace("Bearer ", "");
  if (!token) return res.status(401).json({ error: "Missing token" });

  jwt.verify(
    token,
    getKey,
    {
      issuer: `https://cognito-idp.${process.env.AWS_REGION}.amazonaws.com/${process.env.COGNITO_USER_POOL_ID}`,
    },
    (err, decoded) => {
      if (err) return res.status(401).json({ error: "Invalid token" });
      req.user = decoded;
      next();
    },
  );
}
And, mount it on your routes, like so:
app.get("/api/user/profile", requireAuth, async (req, res) => {
  res.json({
    sub: req.user.sub,
    email: req.user.email,
  });
});
Step 7: Auth-aware routing in the frontend
In Next.js 16, auth-aware routing is handled using proxy.ts. Proxy runs before a request completes and is ideal for lightweight auth-based redirects.
import { NextRequest, NextResponse } from "next/server";

export function proxy(req: NextRequest) {
  const token = req.cookies.get("accessToken")?.value;
  const isProtectedRoute = req.nextUrl.pathname.startsWith("/dashboard");

  if (!token && isProtectedRoute) {
    return NextResponse.redirect(new URL("/", req.url));
  }

  return NextResponse.next();
}
Final Thoughts
As you might have already realized that AWS Cognito isn't really a 'plug-and-play' solution, but once you successfully wire it up, it’s rock solid. The secret is to respect the fact that — Cognito manages the identity, frontend handles the UX, and the backend only trusts verified tokens. Sticking to such separation, helps establish a secure, scalable, and the best possible auth system.
References
- AWS Cognito Documentation — Official documentation for Cognito User Pools, Hosted UI, OAuth flows, scopes, and token handling.
- Cognito OAuth 2.0 Flow — Explains how Cognito’s OAuth 2.0 authorization code flow works, including token exchange via the /oauth2/token endpoint.
- Request Lifecycle & Proxy Flow — Illustrations describing how requests are intercepted before rendering using Proxy.